Pages

Tuesday, December 24, 2013

Christmas is here!


Christmas is here! I have been trying my best to cherish the Holiday by taking some time off work and doing the most important thing: spending time with my loved ones. More than anything else, to me Christmas is about family. Presents are nice, ornaments are pretty, cocoa is yummy, and music is fun, but family is the best part of the Holiday for me.

J and I spent one fun evening touring our neighborhood to look at Christmas lights, cocoa and coffee in hand. That was a fun drive, even when the rain came and fogged up our windows! My nephew played his last Fall basketball game and got a medal for his participation. He was so happy! I finished the last of my 3 segments for WDRB in the Morning and am able to relax my creative energies a bit until January!
We snuggled up under the tree to enjoy the pretty lights and admire the view. Today I am baking Oatmeal Fudge, a family tradition for the Holidays, and by far my favorite cookie! These will be the cookies we leave for Santa (if there are any left)!

Happy Holidays to you! Here's hoping you get to spend some time with the people you love. Be sure to hug them, kiss them, and tell them that they are the best part about this time of year. 

Thursday, December 19, 2013

Videos: Christmas Crafts

I was pleased to be able to appear on WDRB in the Morning three times this month, making crafts for the Holidays. The first video I posted was for a handmade peanut reindeer ornament. Below are two more crafty videos for a Christmas cookie plate and confetti gift tags.


What are your favorite Holiday crafts or gifts to make? I always love hearing ideas from other people. Can you believe Christmas is less than a week away? I better get to crafting!

Wednesday, December 18, 2013

Cookies for Santa

Christmas is only one week away! It's hard to believe, but I almost feel ready after putting the finishing touches on my latest craft for the Holidays--a cookie plate for Santa (and one for the elves, too)!


Making a Christmas cookie plate is simple. All you need for this project is a blank plate, non-toxic or food safe paint, and a paint brush. I used a red plate to create Santa's belly. I found my plates at Target, but you could easily find them at other stores, too.


Using a wide paintbrush, I painted a black line under the center of the plate.


Once the black paint is dry, add a gold buckle with gold paint and a smaller brush. You can also add details on the plate with white paint and a fine brush. I painted "For Santa" at the top of my plate.


Add another coat of paint to the belt buckle and the text and allow plate to dry. Be sure to follow the paint bottle instructions for curing times. The paint I used needed to dry for several days.


As a fun bonus, I used a green plate to make a cookie plate for the elves!


Don't these plates make a cute matching set? This is a fun craft to make, and you have just enough time to create it by Christmas! 


All you have to do now is add cookies & milk! Santa will be pleased. We're partial to leaving chocolate chip cookies for Santa, but Oatmeal fudge is good too. What is your favorite cookie to leave for Santa?


I hope you enjoyed this project, another craft for WDRB in the Morning. Julee at D.I.Y. Louisville is also getting crafty this morning. Don't forget: even if you miss our television appearances you can always check out our videos online

Thursday, December 12, 2013

Fun Confetti Gift Tags

One of the things I think about when wrapping presents for Holidays and birthdays is what the package will look like. The outer wrapping is the first thing people see, and it can add excitement to the gift giving (and getting) experience. I wanted to come up with a fun and simple way to add some interest to a package and created these fun confetti filled gift tags. They are so easy to make!


For this project you will need:
-1 Circle punch
-1 blank card
-1 vellum/plastic bag
-Confetti (I used sequins)
-Tape
-Gluestick

The first step is to punch a circle out of the top part of the card. Next, cut a small vellum or plastic bag to fit the height of the inside of the card.


Tape one end of the small baggie to the inside of the card. Fill the other end with sequins, glitter, or confetti. Next tape the bottom of the baggie to close the opening. Tape the sides to secure the bag to the inside of the card.


Using a glue stick, coat the entire inside of the card with glue (except for the part with glitter). Press the card shut and hold. When this dries, it will become a flat gift tag. The last step is to decorate it with stickers or a marker.


The idea is that the circular window is a pretty glass ornament filled with sparkles. I used a marker to draw a bow and the top of the "ornament" on the tag. See how easy that was? I hope you enjoy this project and will consider adding these fun confetti gift tags to your Holiday gifts to make them extra special.


Wednesday, December 11, 2013

Reindeer Ornament Video

It's fun making handmade Holiday crafts on WDRB in the Morning! Here is the video from Tuesday when I made simple peanut reindeer ornaments with WDRB anchor Candyce Clifft.


What kind of Holiday crafts are you excited about working on?

Don't forget that Julee and I will be on air again on Thursday of this week! As always you can follow my Facebook page for more information and updates.

Tuesday, December 10, 2013

Peanut Reindeer Ornament

The Holiday season is a busy time. Between shopping for gifts, baking yummy treats, gathering with loved ones and dealing with the weather, it's hard to make time for crafting. But if you only craft once this year now is the time to do it. There are so many ideas, and this peanut reindeer ornament is a fun one!


I wouldn't recommend this craft if you or your little ones have a peanut allergy, but if not, this craft is a crowd pleaser for all ages. It's so easy to make!

All you need for this ornament is:
1 peanut
2 googly eyes
1 small red pom pom
Glue
1 pipe cleaner/chenille stick
string or ribbon

The first thing to do is glue the googly eyes and pom pom nose to the peanut and let the glue dry.


While you are waiting for the reindeer face to dry, you can work on your antlers. Take one pipe cleaner and fold in half to make a V shape. Twist the bottom of the V together to make a platform to glue the head to.

Make squiggles on both ends of the pipe cleaner and scrunch to create antlers.


 Once the pipe cleaner antlers are finished, add some glue to the base and put a looped piece of string in the glue. This is how you will hang your ornament.

Now put the reindeer face on top of the glue and hold in place for about 20 seconds. After that, just allow the ornament to dry overnight and it's ready to hang on the tree. 


Kids and adults alike can make this easy reindeer ornament, no problem. I hope you enjoyed this project. It is one of several Holiday crafts that I will be making on WDRB in the Morning this month. To see the other projects that I have made, check out my videos on youtube.


Julee from D.I.Y. Louisville has a great project too. Head on over to her blog and check it out.

Sunday, December 8, 2013

Upcoming TV Appearances


I am excited to announce that I will be appearing on WDRB in the Morning three times this month with D.I.Y. Louisville! We are scheduled to appear this Tuesday, December 10 and Thursday, December 12 as well as Wednesday, December 18.

I hope you will tune in to check out the Holiday crafts that we are planning to make. I am definitely in the Holiday state of mind ever since the snow storm we had on Friday. It's been a Winter wonderland all weekend!

Tuesday, November 26, 2013

Mini Pumpkin Pies for Thanksgiving

Why is it that miniature foods are so much fun? I've had the "mini" bug ever since I made these KY pies earlier this year for Derby. When I started to think about getting ready for Thanksgiving, I decided that I wanted to try to bake some miniature pumpkin pies. These pies aren't just cute, they are delicious, too!


The best part about these mini pies is that they are easy to make. You only need a few ingredients for this recipe:
1 Can (30 oz.) Easy pumpkin pie mix (I used Libby's brand)
2/3 Cup of Evaporated Milk
2 large eggs, beaten
2 refrigerated pie crusts
Cupcake or Muffin pan


Unroll the pie crust and use a bowl or cup to cut circles out of the dough.


Push the circles into the cupcake pan. You're half way there!


Next just combine the pumpkin pie mix, evaporated milk, and eggs. While you are mixing the ingredients, preheat the oven to 425 degrees Fahrenheit.


Spoon the pumpkin pie mix into the cups in the pan.


Once all the cups are filled, bake the pies for 5 minutes at 425 degrees Fahrenheit, and then lower the temperature to 350 degrees and continue to bake the pies for 20-30 minutes depending on your oven and altitude. Pumpkin pies can be temperamental, so be sure to check on them frequently. 


The pies are done once a toothpick inserted in the middle comes out clean. Let the pies cool and then refrigerate, since pumpkin pies are best served cold. You can even add whipped topping (or cake frosting!) to make these mini pies even more special for Thanksgiving.  


Wishing you a Happy Thanksgiving from the Craft E Magee family to yours!

Monday, November 25, 2013

Easy Thanksgiving Table

It's not difficult or expensive to make this fun tablescape for Thanksgiving. It's perfect for the kids because they can draw right on the table! Add small bags of popcorn or mini pumpkin pies for added fun. 


I'll be sharing the mini pumpkin pie tutorial later this week, so be sure to check back!

Friday, November 22, 2013

Photo Friday


Photography is one of my favorite hobbies. I like to think that I'm getting better at it, but I could always use more practice. I have tried a daily photography series on the blog before, but maybe this will be easier. Today I'm kicking off "Photo Fridays." I may not post every Friday, but I definitely would like to make this a regular thing.

Have a great weekend!

Wednesday, November 20, 2013

Thanksgiving Table for Kids

There is an abundance of ideas for fancy Thanksgiving table settings. Just browse the magazine aisle or pinterest and you will see what I'm talking about. I love the use of golds, plums, and oranges in so many of the tablescapes with nice linens and sumptuous feathers or flowers. They are so pretty, but they are not really for me. Inevitably when I set a fancy table, someone spills something and it makes a mess, so I set out to make a kid friendly table for Thanksgiving. 


The best part about this table? You can draw on it because the tablecloth is actually paper!  
Easy? You bet!
Fun? Absolutely!
Spills? Who cares!

Whether you set this table for kids or kids at heart, it's sure to please. Start by covering your table with a roll of brown kraft paper.


Find some crayons, or these cool stick colored pencils, and put them around the table. These orange ramekins were only $0.99 a piece and fit in with the Thanksgiving theme perfectly. 


Kids, and maybe some adults, would love being able to draw on the table! It's a great way to keep the little ones entertained before dinner.


 Because I was going for practical, I used paper plates on this kid-friendly table. It's also a great idea to use cups with lids and straws!


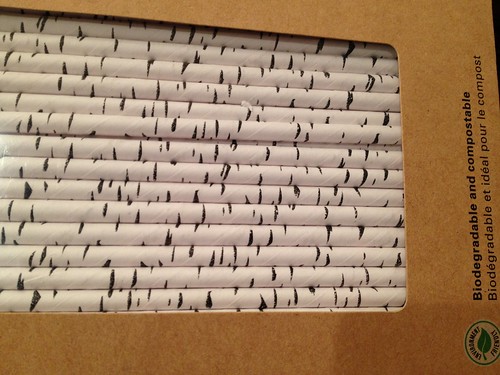
 I love the paper straws that I found because they have a birch tree pattern.

image

What else makes for a fun kids' table? Mini pumpkin pies!


Place cards could be as simple as writing each child's name on the table, but I enjoyed creating cute takeaways with letter stickers. I used feathers to add another natural element to the table.


Another idea I came up with was to add popcorn to the table. It's a fun snack and is a modern spin on a classic element of Thanksgiving--corn!


I hope that you are inspired by this kid-friendly table for your Turkey Day celebrations! Julee at D.I.Y. Louisville created a Thankful tree that would be perfect on this table! What are your plans this year?