Showing posts with label decor. Show all posts

Wednesday, April 8, 2020

Cardboard Spring decor


Nothing can take the place of spending time with family and friends, but due to COVID19 a lot of us aren't able to be together. That's hard, especially if you are celebrating Spring holidays. Crafting is my go-to thing whenever I'm celebrating a holiday or whenever I'm struggling with hardship. Since I'm currently experiencing both, I thought I'd take some time to share this project with you.


Before the pandemic, I was lucky to get together with my friends Julee and Patty to make some Spring decor. We used corrugated cardboard to make different Spring shapes. I chose to make a bunny and an egg. They are super cute, lightweight decorations. I decided to display mine on my mantel with some Spring flowers. 

Now I'll show you how you can make them, too.


For supplies, all you need is glue, a foam brush to apply the glue, and strips of corrugated cardboard (if you don't have any corrugated cardboard, think creatively--using cardboard packing material, or strips of paper or posterboard).

Beginner cardboard shape: Egg


The egg shape is the easiest to make with the cardboard. 

1. Begin to roll the cardboard in a circle (corrugated/bumpy side facing out). 

2. If you need to tighten your circle, place your thumb on the center of the circle and use your other hand to pull the cardboard tighter. 


3. Make the circle as small or as large as you like.

4. Once your circle shape is complete, squeeze one side to create the pointy end of your egg.


5. Glue the loose end of cardboard to the egg.

6. Coat the rest of the layers of the egg with the glue. Let side dry and repeat on opposite side.


Advanced cardboard shape: Bunny


The bunny shape is a little more intricate to make, so if crafting with kids, they'll probably need some assistance.

1. Using shorter strips of cardboard, make an oval for the head and a longer oval for the ears. Glue the ends of the cardboard strips to the shapes.

2. To attach the ears to the head, use another strip of cardboard to wrap around the pieces.


3. One layer might be enough, but if it's not...

4. ...wrap a second layer of this strip around the head and ears.


5. Secure the end of the strip with glue. Coat one side of the head with glue and hold the shape you want in place for a few minutes. The glue dries pretty quickly since you're working with cardboard/paper. Repeat coating of glue on opposite side of head.


6. To make the bunny body, roll strips of cardboard into circles or ovals. The number is up to you. Secure ends of strips with glue.

7. To keep the circles together for the body, wrap another strip of cardboard around them all.


8. Play with the shape to give it the look you like.

9. Coat both sides of the body shape with glue.


10. Attach the head to the body with the glue and hold in place until secure. Coat both sides with glue. 


As you can see the backside of my bunny stuck to the paper because of the glue, but that's okay because the front side looks fine!


You don't have to stick with eggs and bunnies. You could try chicks or flowers or anything for Spring! It's a fun and easy project to make and hopefully you already have some supplies on hand to make this.

Tuesday, January 28, 2020

Baby Gifts on the Glowforge

There is an awesome trend happening with libraries: maker spaces! The Louisville Free Public Library has two locations with maker spaces housing 3D printers, sewing machines, vinyl cutters, and even laser cutters and engravers. Recently I was able to use a Glowforge at the library to make two adorable wall decorations for my cousin's baby shower.

She's having twins(!!) and when I learned of the theme for their nursery, I wanted to make some palm leaf signs to match. As an Elizabeth, I am usually able to find my name all over things at stores and souvenir shops, but these little guys have unique names (Brooks and Ellis), so I wanted to personalize the palm leaves for them.


The first step for this project was to design some cut files (.SVG) in Inkscape (a free, open-source design software). You could use Adobe Illustrator or other design software as well. For this project, I did two separate cut files: one of the palm leaf design and one with the baby names in a script font.

Once I had my cut files, the next step was to arrange them in the Glowforge web app. The palm leaf design was cut twice out of 12x12" plywood boards.


It's really fun to watch the laser cutter do it's thing. I didn't have any engraving on this project, so it was pretty fast with just the cutting. You might be able to see that I had a stray line at the bottom of my vector file, but it's okay because it didn't affect the finished look of the leaf.


This might be weird, but I like the smell of the burnt plywood because it reminds me of a fireplace. When I lifted the leaf out of the Glowforge, the background and middle holes stayed behind to be re-purposed for other projects.


Once the leaves were cut, it was time to upload the babies' names in the script font. This screenshot is what the file looks like when it's been uploaded into the web app, but you haven't yet placed the material in the machine. Unfortunately I was a bad blogger and didn't take any in process shots of the cut for the baby names.


Once the pieces were all cut, I decided to color the palm leafs. By using baby wipes to apply the acrylic paint to the palm leaves, I hoped to give them more of a wood "stained" look than a painted look. The paint color was "Parakeet Green" by Handmade Modern, which you can find at Target. I left the baby name pieces unpainted for the natural look, and used some tacky glue to attach them to the palm leaves. I made sure to let them dry overnight before wrapping them up for the baby shower!


What do you think? I think they turned out pretty good! Have you ever used a Glowforge before? Got any tips for beginners?

Wednesday, February 13, 2019

Be mine, Valentine!

Valentine's Day is upon us once again. I love love! And I always feel it's best to use this holiday to show my love with cards, candy, or even text messages to people I care about. I'm fortunate to have not only my husband to share it with, but my parents, siblings, and plenty of friends I like to call my "Galentines." One of my Galentines hosted a brunch for us gals over the weekend, which was a lot of fun!

Another one of my very best Galentines, Julee, is known to many of you for her blog DIY Louisville. This year the two of us have decided to take our love of holidays, crafting, and party planning to the next level by collaborating on a new project called Party in Lou! I hope you'll check out our website and follow our Instagram page @PartyinLou!


My creation for this Valentine's "Smooch" party decor was an ombré pink pom-pom banner. I love making pom-poms with yarn. It's so relaxing, and which a plastic pom-pom maker it's super easy, too! All I did was buy one skein of the pink ombré yarn and made several pom-poms in varying sizes (from 3-4 inches) in diameter with the pom-pom maker. Then I trimmed the pom-poms down with scissors, which is how you get such a soft, fuzzy look for your pom-poms.

Using a large sewing needle, I threaded the pom-poms onto a length of yarn to turn them into a pom-pom banner. It is a great decoration, and easily customizable for your theme. Julee came up with the idea of a "Smooch" lips theme for a Valentine's Day party. With her crafted cake toppers, my pom-pom banner, and some simple red, pink, black, and white decor, we were all set to have the cutest party decor.


It didn't hurt that there was cake to match the theme as well! Julee and I agree that handmade items go a long way to make a party feel special. That's why we're so excited to be collaborators on Party in Lou. We hope you'll join us on Instagram and follow our website.

Not it's your turn: What is your favorite party decoration to handcraft? Or, what is the party decoration you would like to learn to make?

Friday, October 5, 2018

Three Simple Ways to Decorate Your Mantel

Mantel decorating (or in my case, shelf decorating) can be a lot of fun, especially if you use the seasons to switch it up and bring some fun and personality to your living space. Today I thought I would share photos of the same shelf, decorated three ways. I hope it helps to spark your own creative juices for decorating your space. One of the looks could work year-round, while the other two are timely for Autumn. (If you're curious about where I got any of the items on my shelf, just leave me a comment about it and I'll let you know!)

Mantelscape #1 - Books and Heirlooms

I love books. My husband loves books and writes books. Even our wedding reception involved books. It's safe to say, books are big in our house. I decided to grab some of our favorite books and some with the prettiest covers to create the first look. By centering our beloved books on the shelf and pairing the display with family heirlooms like my grandpa's camera and grandma's iron (used as a book end), I've added sentimentality to the look that is personal for us. I love playing with levels and height, and will swap things in and out until it feels "right." The candles and plants add some symmetry to complete the look.


Mantelscape # 2 - Fall Harvest

The second look reminds me of the Fall Harvest. The center pumpkin is propped on a bundt cake pan (another family item from my grandma). I've used the same candles from look #1 but also added a battery-powered white pillar this time. The "Happy Fall" chalkboard sign was a steal for $5 at Target. The other sign is made of tin to look like copper. I've used placemats with sunflowers and pumpkins on each side of the shelf. The plush pumpkins and sprig of faux lamb's ear add some lushness to the simple decor.


Mantelscape # 3 - Vintage Halloween

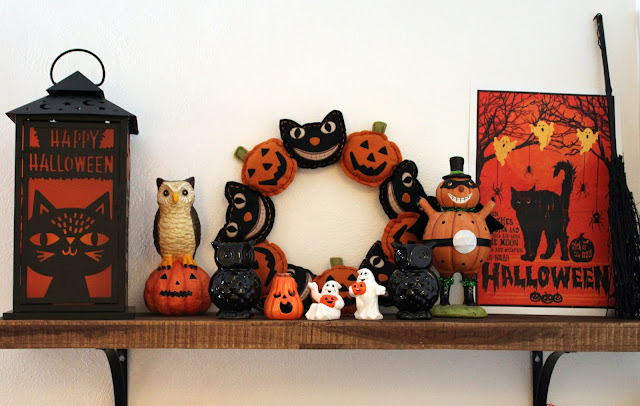
I just love Halloween! I've noticed over the years that I have a particular affinity for vintage and/or vintage-looking Halloween decorations. For festive decor this year I decided to pair some of my favorite vintage decorations for a spooky shelf in the best Halloween colors: orange and black! The cat and pumpkin wreath in the middle acts as "anchor," while the lantern and broomstick add some height on each side. Fun pieces are placed in between including two vintage ceramic ghosts and a pumpkin tealight holder.


I hope you've enjoyed this post on three simple ways to decorate your shelf/mantel. It makes me so happy to play around with the different decor items until I get a look that is just right for the season. Happy decorating!