Tuesday, October 9, 2018

Emoji Birthday Party

As a crafter, I love to make things, and that's no different when it comes to planning parties. I love working on coordinating food and decor around a party theme. That's why I was excited to plan an emoji-themed birthday party for my nephew a while ago. 

At the time, his favorite emoji was the "cool dude" smiley face with the sunglasses, so I used that as inspiration for my emoji cake. I just used a boxed cake mix and white icing mixing with food coloring. Fondant probably would have made a neater presentation, but I went with what I had on hand. Yellow plates and napkins, paired with a pizza print tablecloth and emoji Pez party favors made for a fun tablescape.


An easy DIY project for an emoji party is hanging lanterns. All you have to do is cut out pieces of felt for faces and hot glue them to yellow paper lanterns.

*Tip: Use a stack of coffee filters to hold the lantern while you are gluing on the face pieces. That way, the round object won't roll away as you glue!


This lantern is one cool dude!


I also made the winking tongue-out smiley and heart-eyes smiley to hang over the table.


A homemade emoji banner would be easy to make but I chose to use a gold Happy Birthday banner that we already owned. Some emoji pillows doubled as decor (making great seating on a bench in the dining room) and gifts for the birthday boy.


Party games including emoji jewelry-making and a board game called "Googly Eyes."


Playing "Googly Eyes" the board game.


Here I am with the birthday boy!


Pizza, watermelon, and wings were on the menu as fun, finger-friendly foods.


Some black and white candles topped the sunglasses emoji cake when it was time to make a wish!


Angry pillow photo-ops aside, this emoji party was nothing but happiness and fun! With a combination of store-bought items and homemade touches, it's easy to tailor this party theme to the emoji fan in your life!


Friday, October 5, 2018

Three Simple Ways to Decorate Your Mantel

Mantel decorating (or in my case, shelf decorating) can be a lot of fun, especially if you use the seasons to switch it up and bring some fun and personality to your living space. Today I thought I would share photos of the same shelf, decorated three ways. I hope it helps to spark your own creative juices for decorating your space. One of the looks could work year-round, while the other two are timely for Autumn. (If you're curious about where I got any of the items on my shelf, just leave me a comment about it and I'll let you know!)

Mantelscape #1 - Books and Heirlooms

I love books. My husband loves books and writes books. Even our wedding reception involved books. It's safe to say, books are big in our house. I decided to grab some of our favorite books and some with the prettiest covers to create the first look. By centering our beloved books on the shelf and pairing the display with family heirlooms like my grandpa's camera and grandma's iron (used as a book end), I've added sentimentality to the look that is personal for us. I love playing with levels and height, and will swap things in and out until it feels "right." The candles and plants add some symmetry to complete the look.


Mantelscape # 2 - Fall Harvest

The second look reminds me of the Fall Harvest. The center pumpkin is propped on a bundt cake pan (another family item from my grandma). I've used the same candles from look #1 but also added a battery-powered white pillar this time. The "Happy Fall" chalkboard sign was a steal for $5 at Target. The other sign is made of tin to look like copper. I've used placemats with sunflowers and pumpkins on each side of the shelf. The plush pumpkins and sprig of faux lamb's ear add some lushness to the simple decor.


Mantelscape # 3 - Vintage Halloween

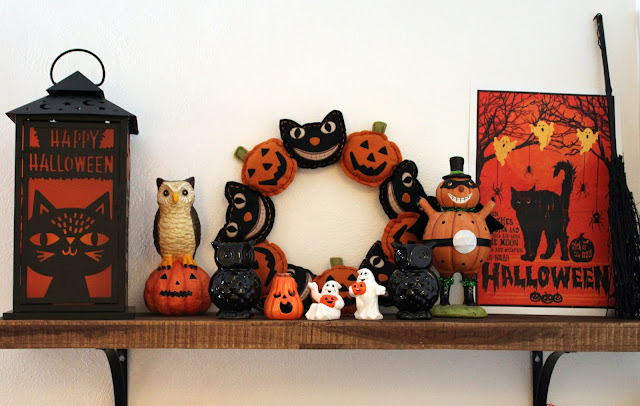
I just love Halloween! I've noticed over the years that I have a particular affinity for vintage and/or vintage-looking Halloween decorations. For festive decor this year I decided to pair some of my favorite vintage decorations for a spooky shelf in the best Halloween colors: orange and black! The cat and pumpkin wreath in the middle acts as "anchor," while the lantern and broomstick add some height on each side. Fun pieces are placed in between including two vintage ceramic ghosts and a pumpkin tealight holder.


I hope you've enjoyed this post on three simple ways to decorate your shelf/mantel. It makes me so happy to play around with the different decor items until I get a look that is just right for the season. Happy decorating!

Thursday, October 4, 2018

What's up, witches?

It wasn't the best lighting situation when I snapped these photos on a rainy day recently, but I had to share my latest witchy creations, Agatha and Kitty! These poor dollies had to wait a long time before they got their hair and hats. I tried something new for Agatha (the witch with the orange hat), creating her hair by sewing a knitted rectangle of purple yarn to her head. I like the way she turned out! Both dolls stand around 16 inches tall from hat to toes. 

Agatha


Kitty


Well, I was going to link to the posts of my other witch dolls creations from over the years, but it seems I've never posted any of the other witch dolls that I've made besides Winnie! I will just just go ahead and upload past Halloween dolls I've made here, too.

Esmerelda


Minerva


Elora


Luna, Esmerelda, and Erwina


I hope you find these dolls as BOO-tiful as I do! Happy Craftoween!

Tuesday, October 2, 2018

Hello, October!

October is one of my favorite months of the year! It probably has a lot to do with Halloween being my favorite holiday and Fall being my favorite season. I can't wait to bust out the Halloween decorations and make our house feel festive. In the meantime I've been working on the Halloween Haberdashery quilt pattern as part of a quilt along being hosted by the pattern's creator: Melissa Mortenson at Polka Dot Chair. I have made three quilts in my life and all three of them were given away as gifts. This quilt is one I'm making just for me!

A friend of mine asked if I thought this quilt would be good for beginners and I told her that it probably is not the first thing you should ever sew, but if you want to expand your skills, it is a really good project. So I'd rate it intermediate skill level, or beginner plus. Each witch hat quilt block is pretty involved with all the cutting and sewing, but there is something so satisfying with seeing the finished product. 

If you are a beginner with quilting, I would recommend getting a wider cutting mat than the one I have (pictured below). Find a 50% off coupon to make it cheaper because cutting mats can be expensive. I also really love the clear acrylic rulers. I already had a small square one from a baby quilt that I made, but used a coupon to get this one for the Halloween Haberdashery quilt project (it's 8 1/2 inches by 8 1/2 inches).


You can check out all of the quilt along posts on Instagram with #halloweenhaberdashery. Happy hallo-crafting!

Friday, August 3, 2018

Carnival themed party

Five *cough* years *cough* ago, we celebrated my grandmother's 80th birthday with a carnival/circus themed party. Apparently, this blog post has been sitting in my drafts ever since, so now it's time for it to see the light of day!

Craft E Magee teamed up with family to celebrate a fantastic lady's birthday: Grandma Janet! What carnival/circus themed party would be complete without games, a clown, and fun treats? Scroll down to see all of the fun things that made this party a spectacular extravaganza!

J and I handmade illustrated posters for each of the sections of the space where we hosted the party. 


I also got some clear plastic gallon "paint" buckets to make inexpensive centerpieces. Simply add some red and white striped scrapbook paper (for about 25 cents) around the inside, securing with tape, and you've got the perfect circus centerpiece. Top it with a plastic tiger or elephant and you're all set!


A photo booth is a must for any extravaganza, so family members helped gather props to use against a red and white striped piece of fabric that served as our backdrop. 


Mr. J and I went with black and white and red all over for our photo!

We even had a friendly clown at the party which was a hit with the kiddos.


Simple games like ring toss, tic-tac-tow, and bowling were easy for the kids to play without parental guidance.


Party treats included animal crackers, peppermints, Pixy Stix, gumballs, Cracker Jack, Circus Peanuts (marshmallows), ring pops, and more. You will notice we utilized some old trunks for some of the props and treats at the party. It's a fun way to carry the theme even further.


If you have a Jack-in-the-box on hand, it would make a great centerpiece as well!


Or simply fill some popcorn boxes and let people grab and go!


We were lucky to borrow a popcorn machine, which added to the festivities.


A simple, but special way to decorate the cupcake stand is to use paper raffle tickets around each tier. Affix tickets with tape so you can re-use your cupcake stand with other themes.


Along with desserts, and carnival foods, we had some healthier fare options too, including fruits, veggies, and salad.


It really was a fun party full of our large family and even some of Grandma's friends. Thanks to my family for helping to pull off this wonderful 80th birthday extravaganza for this fabulous woman!


Have you ever thought about doing a circus theme or carnival theme party? I'd love to hear about it or see links in your comments. Party on!