Wednesday, February 27, 2013

D.I.Y. Louisville sponsor giveaway!

IMG_3417
Did you like the beaded earrings that I made last week? Well, you're in luck because I am giving them away as part of the D.I.Y. Louisville February sponsor giveaway! There are 5 more days to win, so skip on over to enter!
Craft E Magee and DIY Louisville

Monday, February 18, 2013

Make Your Own Beaded Earrings

This next project is a lot of fun, for not a lot of money. You only need a few supplies and can make as many earrings as your heart desires. They make the perfect presents and are fun to do with the girls! My mom and I had a blast making these.
IMG_3421title

To make the beaded earrings, you will need:
Beads (Glass beads are very pretty)
Thin jewelry wire (I used 24 and 26 Gage wires)
Earring hooks
Wire cutters
Needle nose pliers

IMG_3385

First, select two identical sets of beads for your earrings, so that they match.

IMG_3386

Next clip 2 pieces of a few inches of wire (one for each earring).

IMG_3388

Now comes the fun part, the earring assembly!
1. Slide your selected bottom bead onto the wire.
2. Slide the next bead onto the wire.
3. Slide the earring hook onto the wire.
4. Bend the right side of the wire down.
5. Bring the right side of the wire back through the beads.
6. Twist or coil the wire at the bottom on the beads (tightening to hold the beads in place).
7. Make sure the coil looks attractive and is durable. I usually coil one side of the wire all the way around the bottom and leave the other side hanging.
8. Clip off the excess wire.
9. Make the matching earring and your finished!

collagewireearrings

The beads really make the earrings, so be sure to pick beads that you love! We got a whole jar of these beads for $15 and have made over 30 pairs, and still have tons of beads leftover!
They make excellent gifts, so remember this craft for the holidays!

IMG_3417

Sunday, February 17, 2013

Presidents Day Craft

IMG_3370

This craft is so easy, but my nephew was very excited about it. Since Presidents Day is tomorrow, he begged for us to do a craft. He was surprised to learn that former presidents are on coins, so we tried our hand at tracing them on paper with crayons.

All you need is paper, crayons, and coins! Simply place your coin (we used quarters, pennies, nickels, and dimes) under a piece of paper and shade it with crayon. Be sure to hold your coin in place so that it doesn't slip around and ruin your shading.
Presidents Day craft

It's such an easy craft for kids!

IMG_3351

Of course then my nephew wanted to draw his version of the American flag and more! :)

IMG_3362

So what are you waiting for? Grab some crayons, coins, paper and go!

IMG_3358

Wednesday, February 13, 2013

Handmade Valentine cards

I had a blast making handmade Valentines with my friends at the February DIY Louisville meet-up! Good Garbage was there with some materials we could recycle into cards. I recycled some pages from an old book that was falling apart by punching out hearts and making a bunting inside the card. 
Untitled
Untitled
It took a while, but I flipped through the book to make sure I could find pages about love, before I clipped out my little paper hearts.
Untitled
Look! It's a surprise on the inside!
Untitled
Untitled
You are short on time, but it's never too late to make some handmade cards. Julee has some last minute ideas if you need them, but use your imagination! You could also use my printables (One, Two)--free, fast, and easy!
Untitled

Tuesday, February 5, 2013

"Struck By Cupid" Heart Wreath

IMG_3182a

The best part about crafting for any Holiday is of course making decorations! This wreath is fun and easy for Valentine's Day. Using a wooden dowel, a styrofoam heart form, felt, ribbon, and burlap, you can make this pretty wreath for your home.

You will need: 
Heart form base
Scissors
Ribbon
Twist ties (to make the handmade bow)
Burlap fabric (Scrap pieces, maybe a 1/2 yard)
Wooden dowel
Hot glue

IMG_3082 
To assemble the Cupid Heart Wreath, first place the dowel rod on top of the base and mark the four spots where the arrow will pass (left outside, left inside, right inside, right outside) with a pen. Using the pen, or knitting needle, or other object, start the holes in each side of the heart form. Push the dowel through.

Cut a thin strip of burlap fabric and tape/glue the end to the back of the heart and begin wrapping tightly around the heart. Remove the dowel to wrap all the way around. If you run out, just cut a new strip of burlap and begin wrapping where you left off. I used three pieces of burlap to wrap this heart. When you have covered the entire heart form, tuck in the end on the back and secure with glue.
Find the holes in the styrofoam underneath the burlap and cut through for the wooden dowel. Insert the dowel through the heart.

vday wreath

Once you have the dowel rod in place, you can turn it into Cupid's Arrow!

IMG_3125

 Cut two triangles from felt for the arrow end. Cut a rectangle that is 4x7 inches. Fringe both ends of the rectangle and fold in the center.

IMG_3142

Hot glue the slanted sides of the triangles together. Let cool. Now glue the bottom of the triangle onto the end of the dowel rod.

IMG_3153

Wrap the fringed piece around the other end of the arrow and tie on with another piece of felt.

IMG_3146

You can use glitter to accent the felt pieces on the arrow to make it sparkle.

IMG_3156

Once the arrow is finished, add the bow to the wreath.

IMG_3133

I made a big puffy bow and then added another one in a different pattern. To finish the wreath, I put a red painted wooden heart in the center of the bow.

IMG_3165

The last thing to do is tie another piece of burlap to the top of the heart to hang it up. Happy Valentine's Day!

IMG_3181

Craft E Magee on WDRB!

I had the opportunity to share the Valentine's Day cards and heart shaped crayons on the local morning show a few weeks ago. If you live in Louisville, be sure to tune in to WDRB in the Morning again this Wednesday, February 6, when I will be on again sharing a Valentine's Day decoration!


Julee from DIY Louisville made some great t-shirts with freezer paper stencils on the same show last time, and will be on again this Wednesday making a fun heart shaped tote for Valentine's Day cards or candy. It's a great craft to do with the kiddos!

I feel very fortunate that WDRB in the Morning has allowed us to craft on air, and I am excited to say that they have offered the segments to Julee and I every other Wednesday! We have some great crafts planned, so be sure to watch my Facebook page for details every other week.

Monday, February 4, 2013

Mardi Gras & Valentine's Day Boutineers!

IMG_3287

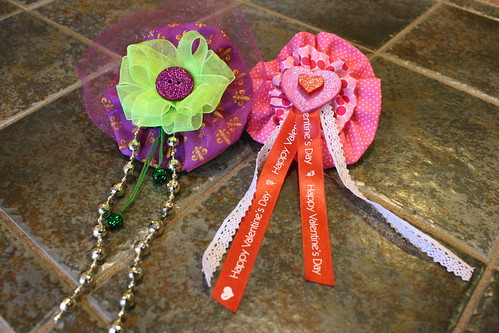
Need a little splash for your outfit during the February Holidays? This year Mardi Gras falls 2 days before Valentine's Day, so this is a crafty two-fer! Make these crafty boutineers to wear and you're set for Mardi Gras and Valentine's Day!  

IMG_3259
 
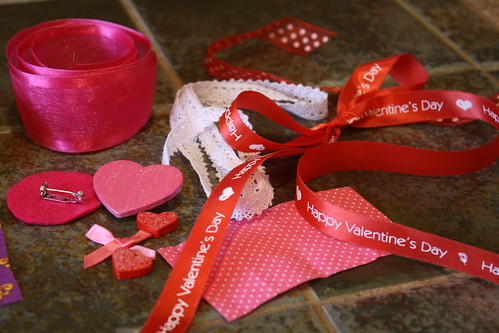
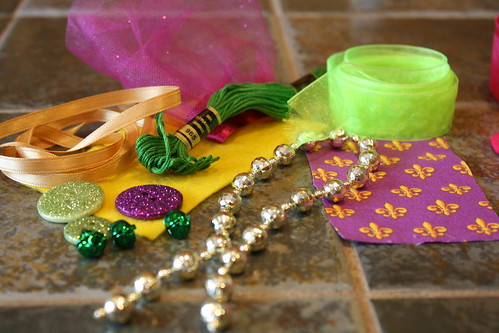
Use up some remnant supplies like ribbon, lace, scrap fabric, trims, and baubles to make the Valentine's Day pin. You will also need some pinbacks, felt, needle, thread, and hot glue.

IMG_3196

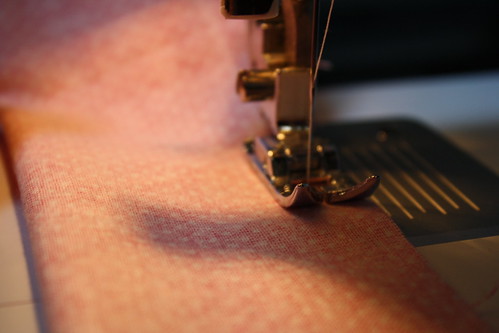
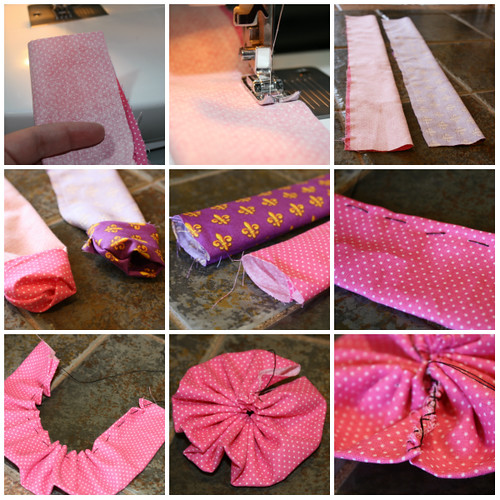
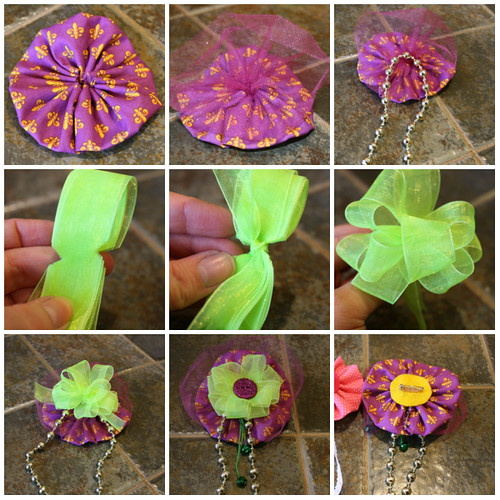
To sew the ruffle base of the Mardi Gras and Valentine's Day pins, cut a piece of fabric that is 12 inches long by 5 inches wide. It doesn't have to be exact. Fold the fabric long-ways, right sides (patterned sides) facing each other. Sew along the side of the fabric to create a tube shape.
Turn the fabric right side out. Thread a needle and knot the end. Sew a loose running stitch (I used black thread for contrast) along the machine sewn edge of the fabric tube. Pull the thread to bunch the fabric and create a ruffle. Tie the ends of the thread together and stitch up the unfinished edge to create a circle.

collage1

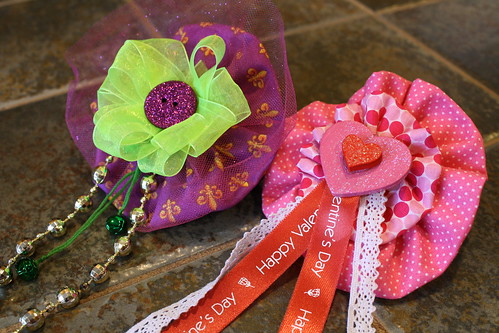
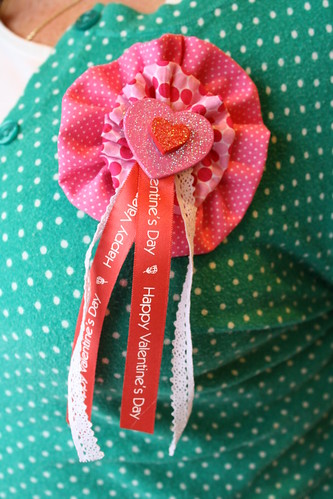
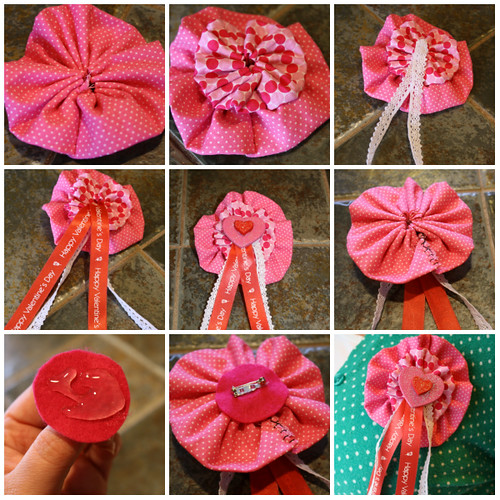
Flip the ruffle over and add ribbon, lace, and baubles with hot glue. I used painted wooden hearts for the Valentine bountineer. Glue a pinback to a felt circle and then attach this to the back of your pin with hot glue to finish your boutineer!

collage2

For the Mardi Gras boutineer, of course I had to use beads, but I also added some tulle and some bells for fun!

IMG_3197
Start with the ruffle circle for the Mardi Gras boutineer. Hot glue the tulle and beads and bells to the ruffle. I also added a handmade bow with some bright green ribbon. I topped the bow with a purple glitter button. Remember to add the felt circle and pinback to the bountineer and it's ready to wear!

collage3 

IMG_3297
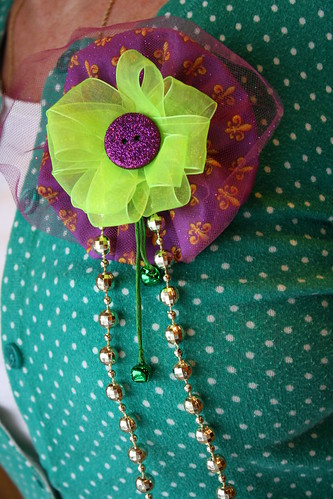
I hope you enjoy these fabulous accessories for Mardis Gras and Valentine's Day!
IMG_3262

Sunday, February 3, 2013

Day 34: 365 Photo Challenge

2/3/2013 by E. Magee
Day 34: Sewing! What Super Bowl?

Cookie Cutter Stamped Stationary

I am a big fan of the handwritten note. I love sending cards in the mail, and I love to get them too! In the digital age, wouldn't it be nice to slow down and make some handmade stationary? This project is simple to make.
IMG_3056

All you need is:
Paint
Cookie Cutters
Cardstock Paper
Paper cutter (or scissors & ruler)
Round corner punch (optional)
IMG_3021

Cut a piece of cardstock paper to note card size (4.25 x 5.5 inches). Punch the corner edges to round them (optional) or use the card as is. Pour some acrylic paint onto a paper plate. Press the cookie cutter (we used the shape of the state of Kentucky) into the paint and then "stamp" the notecard. Use a straight edge to stamp in an alternating color paint and make lines on the notecard to have straight edges to write on.
collagecards

You can also stamp the lines and cookie cutter shape in the same color to make a nice notecard. Make a set of matching cards and they can serve as recipe cards!
collagecards2

Another fun idea is to make art! Drag some acrylic paint over thick paper with a piece of cardstock.
IMG_3050

Stamp a cookie cutter shape (like this elephant) over the painted background.
IMG_3051

You are left with a cool effect on the paper.
IMG_3052

Let it dry and put it in a frame, and you have a nice piece of artwork!
IMG_3053

Saturday, February 2, 2013

Days 27-33: 365 Photo Challenge

Day 33: Snow
2/2/2013 

Day 32: Puffy clouds and blue sky
2/1/2013 

Day 31: Cereal
1/31/2013

Days 27-30: Unfortunately, I had a wicked sinus infection and didn't take any pictures. I guess I have to add photos onto the end, like snow days being made up in the summer? haha!